I swear tackle companies are trying to invent ever more complicated carp rigs to part us from our cash. It’s not uncommon for rigs to include multiple swivels, multiple float stops, tubing, shrink tubing, bait screws or rig rings these days. It’s very easy to get caught up in the carp rig hype and go along with these rigs. Tackle companies are very happy for you to do this as you’ll have to buy twice as many rig components but the truth of the matter is that all these rig bits just aren’t necessary. In this article I’m going to look at easy to tie carp rigs for beginners. This article includes a video that takes you through the knotless knot carp rig and the video itself is entitled ‘easy to tie carp rigs for beginners’ too, you can click the play button and watch it from this page, it’s well worth a look, specially the workings of the rig which comes later in the video.
The knotless knot carp rig starts with a loop, mine is a simple 3 times through the eye overhand knot that’s pulled tight with a Hook Pulla

Once the loop is tied and the bait is hair-rigged it’s time to form the knotless knot. The hook is important and I use a Kamasan B175
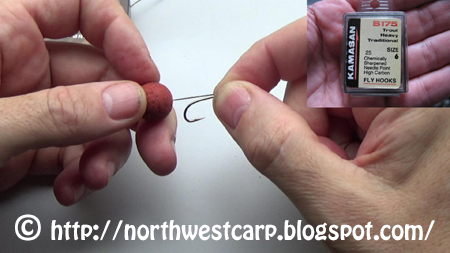
Thread the sink link hook length through the back of the eye of the hook, the hair should come off the back of the eye and run down the back of the hook shank. You can adjust the length of the hair at this point and I find 5-10mm from the bottom of the bait to the bend of the hook is about right. With the hair held in place start whipping the braid up the hook shank from the eye, the whipping should start the opposite side from the slit in the hook eye and you should do 14-15 times up the shank. By now the hair should be exiting roughly level with the hook point. Once this is done simply take the end of the sink link hooklength and pass it back through the eye of the hook from the back of the hook to the front, so it comes out on the inside of the hook eye.

Once the knotless knot has been tied simply add a Swivel

As with any carp rig, this simple carp rig requires tuning and you do this by making a note of the hook holds of the fish you catch. A fish nailed in the bottom lip is perfect, if a hook pull occurs this is a sign the rig is too short and you should tie another an inch or so longer to give the carp a chance to get the bait properly. If the carp is hooked in the scissors or just outside the mouth this is a sign the rig is too long and you should re-tie the rig an inch or two shorter because the carp has too much room to move. By concentrating on the hook holds and tweaking the rig you can nail your carp correctly in the bottom lip most times. From experience I would suggest a starting rig length of 8-10” then work from there.
Carp rigs made with braid can suffer tangles, they tangle in 2 places, the hooklength and the hair itself. To prevent hooklength tangles add a two or three bait stringer or Mesh Bag

So that’s it for easy to tie carp rigs for beginners, the rig is superb, it’s caught me thousands of carp over the last 30 years and I still use the rig today, if you’re stuck wondering which carp rig to try I’d recommend this one, it’s a simple carp rig, it’s safe carp rig, it’s a great river carp rig, it’s a canal carp rig, in fact it’s just a superb all round and easy to tie carp rig for beginners.
Below is a video called 'Safe Carp Rig' and this is the inline lead arrangement I use with this rig, below that is a video on how to tie the palomar knot which is used for the swivel, check them out, give them a like on Youtube, subscribe to my Youtube Channel and feel free to have a say in the comments section of any of the videos in this article on Youtube.
Tight Lines
Mark.

What is the typical hook size to boilie size guideline with long shanked hooks. Also do you use this rig for both bottom, wafter or pop up presentation styles.
ReplyDeletehi mate, i use a size 6 hook for baits of 14mm-18mm, for 20mm and over i go up to a 4 and for baits of 12mm i use a size 8 and for 10mm and under i use a size 10. i change hook pattern for 8's and 10's, the long shank in this video should not be used for carp in less than a size 6, an 8 is too thin in the wire and not up to the job. i swap to a curve shank for smaller hooks.
Delete