Sunday 5 September 2021

Tiger Nut Carp Rig


Tiger nuts are a great bait for carp fishing but how do you present them to the fish?, in this article we'll take a look at my favourite tiger nut carp rig.

Tiger Nut Carp Rig

There are a few rigs you can use for tiger nuts but my favourite is the easy to tie carp rig which utilises a knotless knot, my tiger nut carp rig is just 8-10 inches of ESP Sink Link Braid, a Kamasan B175 Hook and a knotless knot. This is fished with a basic inline lead setup.

To present a tiger nut on this rig I use a 6mm ESP Nut Drill and a 6mm cork stick that's cut to size. Simply take a decent sized tiger nut either from the tin you've bought or from the tiger nuts you've prepared yourself. The nut drill has a small notch sticking out and you should locate this notch against the middle of the tiger nut and push it into the nut.

The nut drill has a notch to help drilling out the tiger nut


With the notch from the nut drill located, it will guide the drill as you apply pressure and begin to core out the tiger nut. By twisting the drill and applying gentle pressure whilst holding the nut still you can bore out the middle of the tiger nut, you should do this until the nut drill has gone right through the nut, carry on twisting the drill as you remove it from the tiger nut and you should be left with a nut that has a perfect 6mm hole right through it.

Core out the middle of the tiger nut


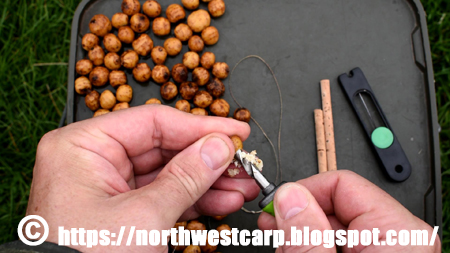
With the hole drilled take a 50mm x 6mm cork stick and push the cork into the hole, it should fit snugly and if you find it difficult to push in, twist the cork stick as you push it into the tiger nut. Once flush with the other side of the tiger nut take a pair of braid scissors and cut the cork stick flush with the tiger nut on the other side as well.

With the hole drilled insert a cork stick and trim flush with the tiger nut


The cork stick through the middle should turn the tiger nut hookbait into a wafter, use a hair needle to put the tiger nut onto the rig, you should go through the cork in the middle when you hair rig your tiger nut hookbait and it goes on the rig just like a boilie would. That's my favourite tiger nut carp rig complete, just fish the tiger nut wafter style with a handful of free offerings around the rig and I promise it will be very very effective at catching carp.

Perfect Tiger Nut Wafter Rig


Below is a video on how to tie my easy to tie carp rig to use with tiger nuts, also below is the inline lead setup I use with the rig and how to prepare tiger nuts for carp fishing if you ever want to do them yourself, it's certainly a lot cheaper than buying tins of tiger nuts from the tackle shop.

Tight Lines.
Mark.


Sunday 22 August 2021

How to Spool a Carp Reel


Spooling a carp reel isn’t a difficult thing to do but if you don’t get it right you can quite often end up with line twist, there is a way to get your mono onto the spool and avoid line twist so let’s take a look at how to spool a carp reel.

How to spool a carp reel

If you have new carp reels that have never been spooled before then spooling your carp reel is quite straight forward, for this article let’s assume there is old line on the spool that has to be removed. I’ve seen some anglers use a drill to remove line from a spool but I’m not a fan and I prefer to do mine the old fashioned way. I simply prop my rod up against the wall, open the bail arm of the reel and just wind the line round my hand until it’s all off, it’s a little time consuming but once it’s done I tie the line off so it won’t spring into a big old mess and simply dispose of it in the bin.

Removing old fishing line from a reel

With the old line removed my backing line is exposed, I have enough backing line on my spools so that I only need 200 yards of mono to fill my spool to the lip. If you have new reels I’d highly recommend putting backing line on them or use spool/line reducers if you have them. It saves a lot of waste and with 200 yards of mono on each carp reel I can spool 2 or 3 carp reels more than once from the same 1000 yard spool of mono.

Spool the reel with backing line first

To spool your carp reel with mono, use the butt section of your rod, I thread my Line through the butt eye, open the bail arm on the reel and tie the mono to the reel making sure that the knot is at the back of the spool. You can use any knot you want for this and I usually use a couple of plain granny knots. You should never lose all your mono off the spool so technically as long as it’s tied on you should have no problem whatever knot you use, hence why I stick to a plain granny knot.

Gardner Pro Light Blend fishing line

With the line tied to the spool, close the bail arm and put a few turns onto the reel. Before you start winding your line onto the spool make sure your spool of mono is on the floor with the label facing upwards, the mono should come off the spool in an anti-clockwise direction, this is really important, if the line comes off the spool in a clockwise direction you’ll get a lot of line twist so always have the label facing upwards and the line leaving your spool of mono anti-clockwise. Once I’ve made a start I like to use a towel or tea towel, I wind the mono through the towel and onto the spool, this does two things, it makes sure the mono is clean as it goes onto the spool and it stops you getting friction burns, if you wind mono onto a reel under tension and you do it quickly you’ll burn your fingers without the towel so it’s better to use one than not.

Once you’re set up just keep the butt eye of the rod above the spool of line so as it coils off anti-clockwise it rises vertically to the butt eye then down onto your reel spool, fill the reel spool right to the lip if you’re using Mono and just under the lip if you’re using braid. Once you’ve filled your reel to the lip you’re done, just cut the mono and you can either finish tackling up your rod or you can clip the mono into the line clip on the spool of the reel until such time as you need it.

Spool a carp reel right to the lip of the spool

And that’s how to spool a carp reel, if you struggle to follow this article please check out the video above, sometimes watching it done is easier than written instructions and the 5 minute video is easy to follow. You should consider subscribing to my youtube channel too, like this blog, it’s full of carp fishing tips to help you put more fish on the bank and it's all free, I'll never charge for my content.

Tight Lines.

Mark.


Sunday 7 March 2021

How to Splice a Lead Free Leader


I like margin fishing for carp and line concealment is really important, I use a combination of slack lines and a lead free leader to make sure there are no lines running through my swim especially at the business end of my carp rig.

How to Splice a Lead Free Leader for Carp Fishing (click below to watch)

There are a few companies who sell lead free leaders, fox seem to be the most popular with their Camo Submerge Leader. I had a lot of difficulty getting hold of the submerge leader, it was always sold out so I ended up buying the PB Products Silk Ray which is just a different companies lead free leader and to be honest, one lead free leader is pretty much the same as another.

When it comes to splicing a lead free leader I like the ESP Splicing Needles, they are quite thin and delicate for a splicing needle but they do the job really well and you do get 3 in a packet, which is useful if you happen to bend or break one.

To splice a lead free leader I go into the leader about 6 inches from the end, once you’re in turn the splicing needle round 180 degrees and push the splicing needle up through the centre of the lead free leader, you should be heading towards the end of the leader, the 180 rotation is because of the hook on the splicing needle. If you accidently come out of the wall of the lead free leader too early, just close the gate on the splicing needle, pull it out of the leader and start again, it takes a bit of practice to get it right. Continue pushing the splicing needle up through the centre of the lead free leader making sure to cover the whole of the splicing needle, the splice you make should be a nice long one so it won’t come undone.

Use the whole length of the splicing needle for a long and strong splice

Once you’ve gone the whole length of the splicing needle, push the needle out through the wall of the lead free leader, hook the very end of the leader, close the gate on the splicing needle and carefully draw it back through the centre of the lead free leader. Because you started 6 inches from the end you should have plenty of leader to be able to adjust the size of the loop you’ve just spliced. Draw the loop down and trim the excess with a pair of Braid Scissors, at this point your splice is complete.

Splice both ends to create a looped lead free leader

You can make a looped lead free leader any length you want, all you have to do is splice both ends of the leader. I find these lead free leaders quite useful for pinning my line down when margin fishing for carp and for pva bag fishing, you can make up your pva bags in advance and simply loop them onto your main line which is a great time saver when you’re on the bank fishing.
Tight Lines.
Mark.

Sunday 17 January 2021

How to Set Up an Inline Lead


Inline leads are great for carp rigs, they are my favourite type of carp lead and they lend themselves very well to my simple carp rig, a carp rig that’s caught me stacks of carp over the years so let’s take a look at how to set up an inline lead for carp fishing.

How to Set Up an Inline Lead for Carp Fishing, click below to watch


Setting up an inline lead starts with Rig Tubing and there are a couple of considerations, the rig tubing should be longer that the hook length and it should be dry. Rig tubing longer than the hook length prevents tangles and dry rig tubing is so much easier to thread. If you’re on a session and changing a rig you should never try and thread the same piece of rig tubing you've been using, use a new and dry piece and you’ll find it will thread much easier than your current wet piece.

Another trick for making rig tubing easier to thread is to snip your line at 45 degrees and thread it with the rig tubing hanging down so gravity assists. If you snip your line, thread downwards and have dry rig tubing you will never have any trouble threading a piece of rig tubing onto your line.

Once you’ve threaded your rig tubing you should add a Tail Rubber, thread the tail rubber onto your main line thin end first then gently push the tail rubber onto the tubing, I find twisting the tail rubber one way and the rig tubing the other helps at this point and you should be able to get them both together easily.

Next you thread on your Inline Lead, thread your line through from the back of the lead so the lead insert sits against the thick end of the tail rubber. Again you can twist the tail rubber as you push it onto the insert. You should push the tail rubber all the way on so it sits against the back of your inline lead.

Inline lead, tail rubber and tubing all set up

To finish your inline lead set up you should tie your carp rig to your main line and your carp rig should be made with a standard Size 8 Swivel which should then fit neatly in the housing of your inline lead. At this point I like to take a pair of pliers and slightly crush the back of the size 8 swivel so it’s slightly oval shaped rather than round. Modifying the swivel in this way makes the rig safer.

Inline lead mould bar is sized for a standard size 8 swivel

To test your inline lead set up you should hold up the rig, if the set up is safe then the lead will fall away from the swivel under it’s own weight. At the most it shouldn’t take more than one shake to release the lead from the swivel. Once you’ve achieved this the rig is complete and ready to go.

Gently squeeze the back of the swivel to make a safe carp rig

Check out the video above to see how to set up an inline lead for carp fishing and if you’re interested in the carp rig itself then check out this great video below called easy to tie carp rigs for beginners, it covers making the rig, adjusting the rig to get the best hook holds and how to keep the rig from tangling, below that is a video on how to tie the grinner knot which is also used to tie the main line to your size 8 swivel, all the videos are well worth watching.
Tight Lines.
Mark.

Shop for Boilies

Shop for Korda Tackle

Shop for Trakker Tackle

Shop for Fox International Tackle

Nothing beats Shimano for Reels

Add to Google Reader or Homepage